Order Digital Reprints
Filed Under
Sign Me Up!
Sign up Digital!
Subscribe to Print!
Interested in Cleaning?
Get Cleaning articles, news and videos right in your inbox! Sign up now.
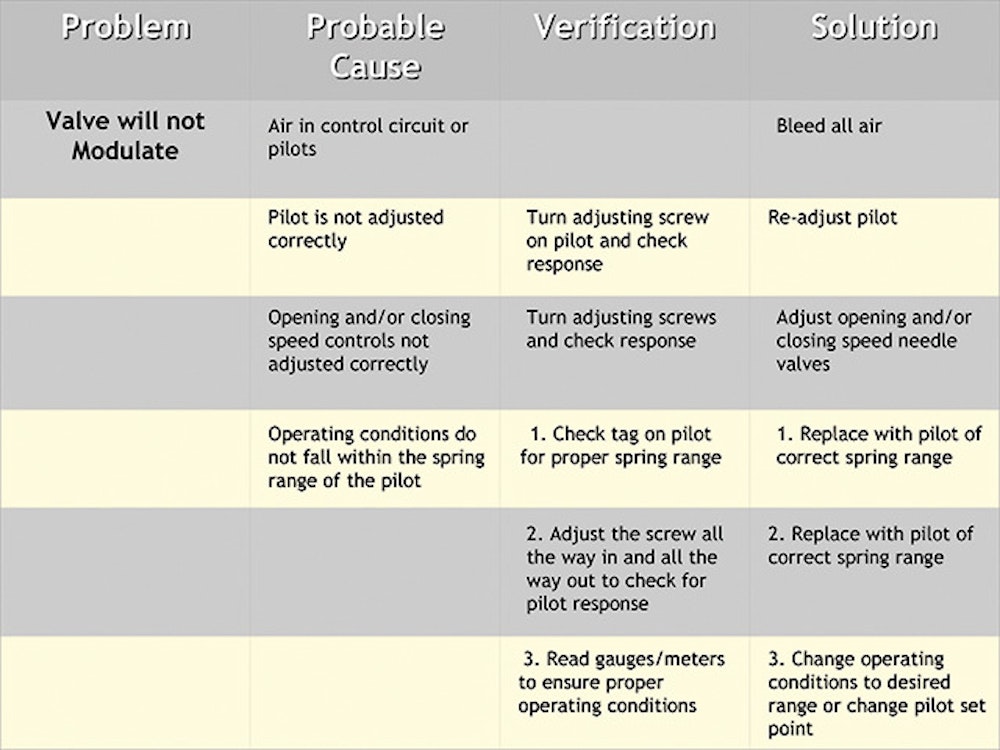
Cleaning + Get AlertsWhether that brand new control valve in your system is the first one you have ever had to look after or if you are an old hand at valve maintenance with dozens of valves in your system, there are a few simple guidelines and reminders for keeping them operating at optimal performance.
It's important to physically check valves at least every 12 weeks or so, assuming everything is running fine in the system. This inspection is to check for any leaks in the tubing, check pressure gauges to ensure the valve is actually doing what it is supposed to and generally inspecting for anything that looks abnormal.
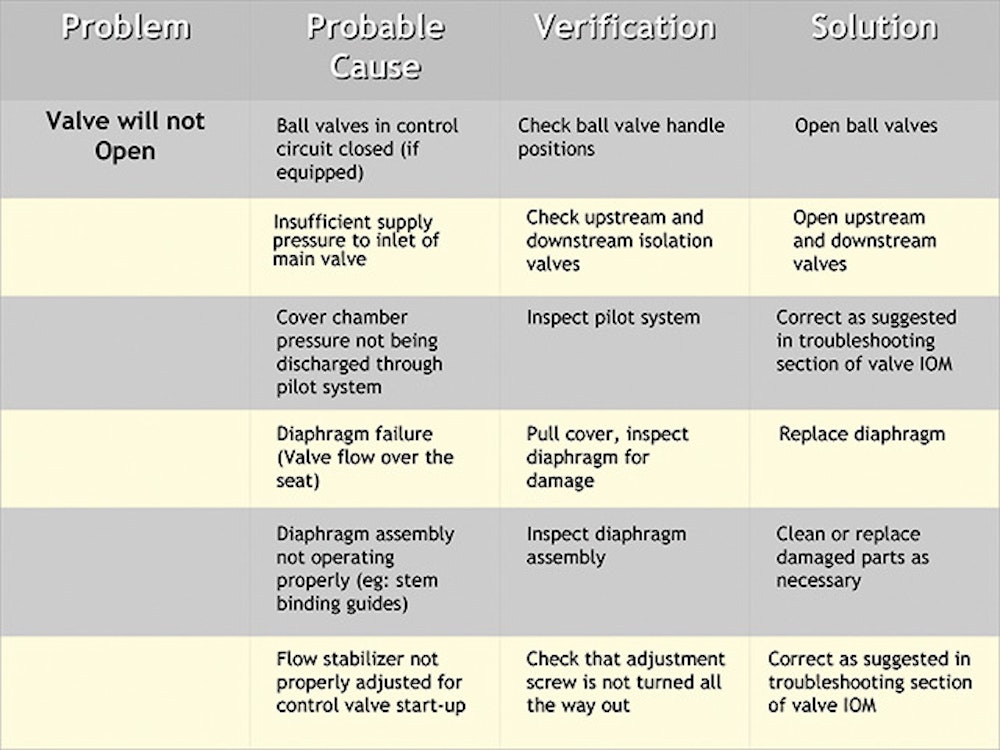
If you determine something is wrong, always make sure you have the correct instruction manual for the valve before beginning any repair work. Today, many manufacturers have manuals available on their websites. As a note of caution, these valves are under pressure and care should be taken to bleed off that pressure before you start taking apart any valves. Safety is critical. A 6-inch valve with 100 psi in the line will have at least 2,800 pounds of force trying to push that cover off the valve, more than enough to cause a serious injury.
Regular maintenance will ensure your valve stays in good working order. Here are some simple tasks you can perform:
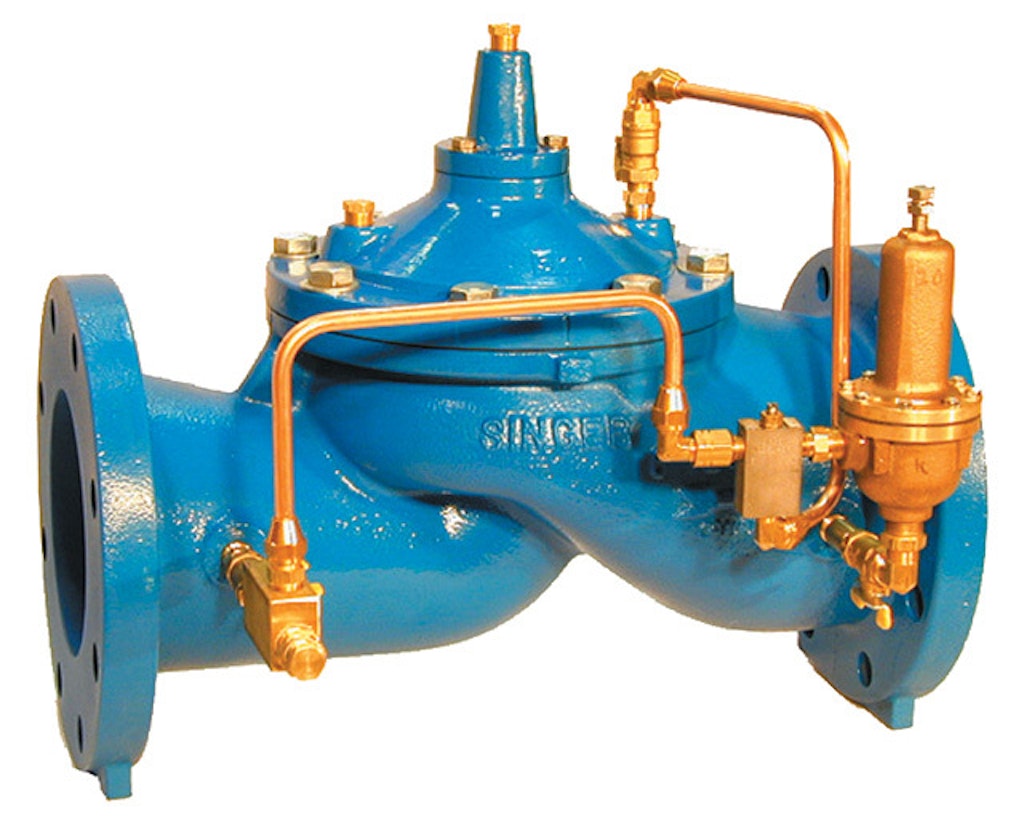
Pilot system shutoff ball valves
Exercise the three isolating cocks on the main valve. These are located in front of the strainer on the upstream side of the valve, on the valve bonnet on top of the valve, and below the pressure-reducing pilot on the valve downstream. Giving the isolating cock a momentary quarter turn to the closed position, then returning it to the open position is sufficient. Open position is when the handle of the isolating cock is in line with its body.
Air in the pilot system
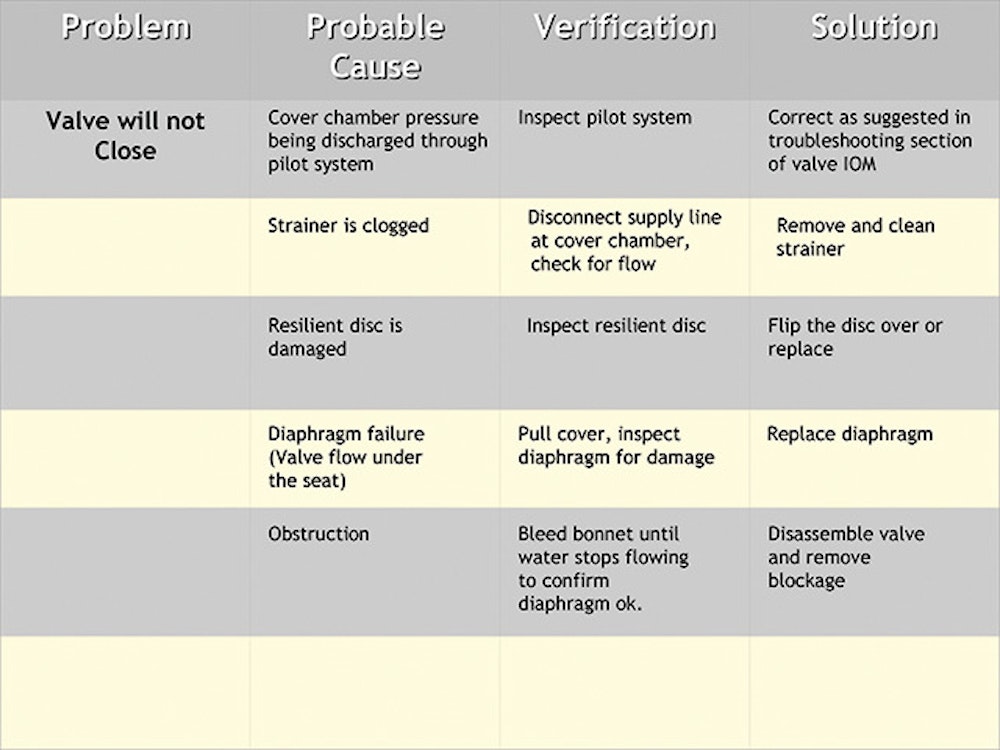
Air is your number one enemy in the pilot system as it will give false readings and cause poor valve operation. Bleed air from the valve bonnet. Valves equipped with a position indicator will have a bleed cock on top of the indicator. Open the bleed cock slightly by turning the handle counter-clockwise. Otherwise, bleed the air from the high point of the valve. If the water runs clear, and no air bubbles are seen in the glass of the position indicator, close the bleed cock. If air is present — the water will be foamy white — run the water until the air is gone.
Strainers
Pilot systems rely on a supply of clean water, usually taken from the inlet of the valve. Either external or flush-clean type strainers can be installed. If an external strainer is installed, a simple occasional flush is a good idea. Normally, three to five seconds is sufficient time to clean the strainer screen. Experience will dictate if it needs to be flushed longer than this, but it is unlikely in a municipal system. A number of water utilities install a ball valve on the flushing plug of the strainer, allowing operators to give a short flush every time they are in the valve station. This helps eliminate problems, as a plugged strainer causes the valve to remain open.
Reducing pilot
Ensuring the control valve pilot is still operational is a simple task. As a cautionary note, before you make any pressure adjustment, make sure that this is acceptable for the system and that any SCADA alarm controls that may be triggered by a change in pressure are turned off. To exercise the pressure-reducing pilot, loosen the lock nut on the pilot adjusting screw and turn clockwise to increase the pressure 5 psi above the normal setpoint. Check that the downstream pressure gauge is tracking the adjustments you are making. Then turn the adjusting screw counter-clockwise to reduce the pressure to 5 psi below the setpoint. Does the pressure gauge track this also? Finally, turn the adjusting screw clockwise to increase the pressure back to the original setpoint and tighten the lock nut. If for some reason the pressure gauge is not moving as you adjust the screw, you either have a bad gauge or a pilot that requires attention.
Main valve flows
Just as we all like to take our cars out for an occasional run to give them a good workout, the valves also need to see some decent flow occasionally. An emergency situation, like a major fire, is not a good time to find out your main valve will not open fully. First, get some flow through the valve station to open the peak demand/fire-flow valve. This could be as simple as opening a hydrant on the outside of the valve station. If you have stations or vaults that have two valves in parallel, with one valve handling normal flow and the other valve handling large or fire flows, the larger valve should be operated for a minimum of five minutes. This can be done by closing the isolating cock on the downstream side (below the pressure-reducing pilot) of the smaller valve pilot system. This will close the smaller valve and cause the larger valve to open, allowing flow into the system. These four steps can be followed for the larger valve while it is in the flowing mode.
This is also a good time to ensure the mainline control isolating valves are in good working order. The gate or butterfly valves used to isolate the control valve should also be checked to ensure they are operational if they are needed.
By following this simple routine, your valves should give years of trouble-free service. Of course, variables such as pressure, operational use and water quality (hardness, TDS, etc.) all have an effect on the periods between major valve overhauls.
About the Author
Mark Gimson is the marketing manager for Singer Valve. He can be reached at mgimson@singervalve.com.